Showing posts with label recipe. Show all posts

Monday, January 27, 2014

Smoky stovetop beets

Beets have a muddled place in my kitchen. Some of us believe beets can and should be a part of every day's menu... hot, cold, raw, roasted, pickled... Anyway you make them, I {and now Brother} will eat them.

The girls declare them "yummy in my tummy," but don't dream purple like their momma.

Tim would prefer, well, any vegetable to a beet. Disappointing. However, this is one of three things he prefers not to eat, so I try to oblige.

What's a beet luvin' girl to do? Wait for an evening youth event serving a dinner, then make a mess of beets. An evening such as this one.

Since it's a single parent Sunday night, I was thinking borscht. Easy, delicious beets. That is until my daughter informed me that I always make soup, and she never wants to eat soup, and can't I please make a pizza instead. She doesn't appreciate this rare opportunity.

A compromise: Smoked Beet Pizza, or a new segment I'd like to call The Penny Gourmet.

Gourmet food has earned the reputation for extravagance and expense. Families concerned with thriftiness, such as a single income family with three kids, can be easily convinced that thrifty food must be common. I disagree. Any food can become gourmet with a little effort, such as fire roasting or in this case smoking.

Since week old snow still lays unmelted in the yard, I will not be using the big smoker. Tim might be that dedicated to the cause, but I prefer my heated kitchen. Thus follows a brief tutorial in Stovetop Smoking {seen first in Homemade by Yvette Von Boven}.

You will need:
A roasting pan with a heat resistant rack (a trivet can work)
Aluminum foil
A couple handfuls of wood chips or loose tea
Optional: woody herbs such as rosemary or juniper berries for flavor
Something to smoke: fish works well. Today we are focusing on root veggies

Directions:
Cube 2 lbs of root veggies (peeling if desired).
Place wood chips or tea leaves in the middle of the roasting pan forming a flat pile. Cover with a double layer of aluminum foil. Lay the rack in the pan and arrange the veggies leaving space between pieces.
Set the pan on a large burner over medium high heat until the wood chips begin to smoke. Turn the heat down to medium low and cover the pan in aluminum foil, crimping around the edges to create the tightest seal possible. Smoke for 30-40 minutes.
Preheat oven to 350 degrees. Move veggies to a greased cookie sheet and roast in the oven until al dente (This step is unnecessary with fish).

These veggies are versatile. I made extra and sliced them thinly for sandwiches or in salad. I might bust them out for snack this afternoon with a bit of sour cream. Anywho...
To create the pizza, I sautéed onions in a honey balsamic glaze {aka, add 1 t each of balsamic vinegar and honey to the translucent onions and caramelize for 1-2 minutes}. Olive oil, salt and sage for sauce. Mozzarella over the top, and you have a sunset pink gourmet pizza for around $3.

In case the time commitment of this venture worries you... All three kids were awake for the whole process. You need to be aware of the stove, but you don't have to stand over it.

Happy smoking!

Wednesday, January 22, 2014

Making candy in the snow

Snow! Finally!

I don't want to exaggerate this snow fall. It's a bare 3 inch accumulation. But in this snow starved climate, we have to pack every important snow day activity into those precious three inches.

For instance - Snow cream. At breakfast due to my excitement. Snow cream is my all time favorite snow treat. If we receive half an inch, I'm dusting cups of snow from every clean surface to make snow cream. Several bowls worth are sitting outside the back door. The only time I don't experience an absolute need for an extra freezer. 

And a new snow day activity: molasses squiggle candy. You Little House fans know what I'm talking about, even if you haven't made it. The hot molasses poured over snow that Laura and Mary make for Christmas in the big woods. Today's science, art and history lesson all in one.

The girls made fantastic mini sculptures, spooning the brown goo over trays of snow. But we learned several lessons in the school of life along the way. 
1. The book illustrator misrepresented how messy this project is. No neat candies in the snow. We spun yards of molasses candy string linking each individual piece. These proved excellent nourishment for the Wonka twins during the lean times while mommy was reheating the candy goop. Or so they explained to me as they gobbled them up as fast as the sugar could harden.

The romanticized drawing...


The sculptural reality...

2. Little man could play short stop. His hands moved at Jeter speed to snatch a candy from the tray where they lay drying. I didn't realize he could reach that far. Nor did I know he could get food in his mouth which was beyond his skill last week with a banana.
3. These big sisters will spoil the brother rotten. They kept trying to sneak "safe" pieces of candy to him once they realized how much he liked them. Here's the face when mean ol' momma interfered with the black market candy trade.

If you are the sort of adventurous family that gives small children spoonfuls of 300 degree sugar and encourages them to draw in snow {I realize how crazy I sound even suggesting this}, here's the recipe:

Molasses Snow Candy

Ingredients
Equal parts sugar and molasses - I used 1/2 c each

Directions
Prepare two large baking trays with snow up to the lip. Store outside to keep the snow from melting until you're ready to pour. Cover a cookie sheet with a towel for drying the candy.
In a small sauce pot on medium heat, combine sugar and molasses, stirring until smooth. A wooden spoon is best for this.
If you have a candy thermometer, use it. Otherwise, have a spoon and a cup of cold water handy. Heat the sugar mixture, stirring frequently to prevent burning. Early in the process, vigilance is not as important as toward the end. Don't leave the pot, say to pick up a crying baby, when the mixture is bubbling and growing.
Heat the mixture to the "hard crack" line on your candy thermometer, about 20 minutes. If you don't have a thermometer, you can check the stage by dropping a small ball of sugar into the cup of water. It's ready when the drop forms a hard candy with a crack.
Spoon the hot mixture in squiggles, curlicues, etc... over the snow. It will harden almost immediately. Move the hard candy to a towel to dry.
If the mixture will not flow off the spoon, return pot to the stove on low heat and reheat mixture until it pours.

A fun old fashioned adventure.

If you are wondering whether this is a safe activity.. to misquote C.S. Lewis: Safe? Course it isn't safe! But it's fun.

Seriously, no one was hurt. The girls understood how hot the candy was and carefully avoided it until it hit the snow.

And a bonus snow recipe:

Snow Cream

Ingredients
Large bowlful of snow {I use the biggest bowl I can find - this shrinks by at least half}
Sugar to taste {1/4-1/2 c}
1 T vanilla
1/2 c milk

Directions
Combine sugar, snow and vanilla. Slowly add milk. Combine until you make a dry slush.
Eat it all and make more!

Yep. It's that simple. You can flavor it with cocoa or espresso powder if you want. I'm happy with plain vanilla, just like my momma made it.

Thursday, August 8, 2013

Our breakfast obsession {dutch babies}

Hearing your children cheer to eat 'babies' is a little creepy, especially early in the morning. But it happens almost every day at present. Because the girls discovered the dutch baby.

A dutch baby is essentially your eggs and toast, but in a custardy pie with a flaky top. Doesn't that sound worthy of a two year old's obsession?

With all the convenience breakfast foods available, it can be hard to muster the energy to make a hot breakfast. I get it. I don't like cleaning dishes any more than the next momma who'd rather move on to her yoga routine than pick up a soapy sponge. That might be why I'm so obliging with this meal. It is no messier than scrambled eggs and actually requires less of my attention while it cooks. I stand in a stupor watching espresso drip down while this sits in the oven. Not so when I scramble eggs. Either the eggs come out a little brown and firm while I make coffee, or I don't get coffee. You can guess how I usually serve eggs. {If you come over for breakfast, don't worry. I hand over the reins to Tim for large group scrambled eggs. His are always perfect thanks to the hawk-like vigilance he learned from his dad. I just worry over the coffee.}

Without further procrastination:

Dutch Babies {GF}

Ingredients
1 c milk
4 eggs
1 c flour {can use whole grain like buckwheat, oat, sorghum}
Pinch of salt
Dash of nutmeg
1/2 t lemon zest*

1-2 T butter for pan

Directions
Preheat oven to 475. Place an oven safe 9-10" skillet in the oven as it preheats.

While oven preheats, combine milk and eggs in blender. Blend until eggs are incorporated {about 30 seconds}. Add remaining ingredients and mix until smooth {about 1 minutes}. Allow to sit while oven preheats to soften whole grain flour.

When oven is preheated, remove skillet {Use a potholder!} and melt butter in pan, rotating to cover the bottom and sides of skillet. Pulse batter once more to mix in any settled flour, then pour in skillet. Place skillet in middle of oven. Bake for 14-16 minutes.

Makes enough for our family of 4.

Add some fresh fruit {we suggest blueberries}, and you've got a complete breakfast. Enjoy!

For the gluten free peeps: Dutch babies are our replacement for french toast. The flavor is very similar without using a loaf of gf bread on breakfast.

*DH found pure lemon oil, not an essential oil, at a cake decorating shop ~ perfect easy substitute for lemon zest. One of my favorite pantry staples.

Adapted from this recipe

Wednesday, May 8, 2013

Gluten Free Pizza Crust {or the Holy Grail}

I've wanted to share this recipe for a while - it came together right after Christmas. And the first bite was Heaven sent; tears actually came to my eyes {keep in mind that I was running high on pregnancy hormones and nauseated most of the time}.

But I kept it to myself. at least until the recipe proved itself. How dare I hold out gluten free hope, only to realize that my first attempts were a fluke.

Living with a major food allergy is one of those losses that normalizes. You forget that anything is different. Unless it is painfully pointed out. For people with gluten issues, yeast is that screaming reminder that you're missing out on something truly fabulous. Whether it be cinnamon rolls or french bread or, in my case, pizza.

What can I say, I'm a gourmet pizza junkie aficionado. And the gluten free crusts we tried tasted like crackers or biscuits. They lacked the essential 'spring' and 'foldability' of real pizza dough. I gave up for a while and used this recipe {which is excellent but completely different}.

Then I opened The Homemade Pantry {have I talked you into buying this book yet?? Seriously, you should.} and saw her recipe for homemade frozen pizza crust, real pizza crust. From the wife of a former pizza parlor guy. I either forgot how bad{!} my first attempts were or was overcome with desperation to taste something that resembled stretched, leavened dough.

Here's the result. The Ellis Family All-time Favorite Meal {we finally hear little shrieks of 'pizza!!!' at dinner time - an American family once more}.
Dough post-rising


All that was left...

GF Pizza Crust

Ingredients
1 1/4 c warm water
1 T active dry yeast
1 t sugar

1 c oat flour
1 c quinoa or sorghum flour
1 1/3 c sweet or white rice flour
1 t salt
2 t xanthan gum
2 T olive oil
2 eggs

Directions
Proof yeast - mix yeast, water and sugar in a glass measuring cup or bowl and allow to sit 5-10 minutes until foam forms across top. 

In a stand mixer, combine flours, salt and xanthan gum. On medium speed, mix in oil, until evenly incorporated. Mix in eggs, until evenly incorporated. Add yeast mixture as quickly as dough will absorb it. The mixture should resemble a thick cake batter. Add flour (1/4 c at a time) or water (1 t at a time) to adjust consistency. Beat dough on high speed for 4-5 minutes, until dough takes on whipped appearance.

Spray olive oil on 2 pizza stones or air bake pans. Split dough in half. Wet hands thoroughly and spread dough as thin as possible on stones. If the dough clings to your hands, wet your hands again. Smooth the surface from the inside of the ball to the outside.

Cover the stones with a wet dishcloth or oiled plastic wrap and allow to rise until double in size (1-2 hours).

Preheat the oven to 475 degrees F. When oven is hot, top your pizza (the crust will be soggy if you top it early). Bake for 10-15 minutes, or until sauce bubbles and cheese begins to brown. 

Note - This recipe freezes well. To freeze without toppings, bake for 5 minutes. Allow to cool completely on pan. Wrap in 2 layers of plastic wrap and freeze up to a month.

Another note - this is not{!} one of those recipes where you just change the gluten free flour for whole wheat flour and carry on. The prep for this dough is completely different as are some of the ingredients. If you want my old {still fantastic} recipe for pizza dough, check it here.

Tuesday, April 2, 2013

Blueberry quinoa salad with shaved broccoli

Broccoli and I have never gotten along. Not a digestive thing. I just don't like broccoli Eee gads - The queen of whole grains and veggies doesn't like broccoli??? I know. It's a nutritional weakness.

After reading Alton Browns must-eat food list, I've made a serious effort to include broccoli in my weekly menu. Which means finding recipes where broccoli doesn't taste like broccoli.

My first brilliant find was over at Smitten Kitchen. Broccoli Cream Pesto, or 'green pasta.' The whole family went nuts for this one, even Momma {who doesn't like broccoli, remember}. Because it doesn't taste like broccoli.

Which got me thinking, maybe broccoli doesn't always have to overwhelm a dish with its broccoli-ness. Maybe I can incorporate broccoli into a dish and feature something other than broccoli. Thus, today's recipe. A cold quinoa salad with fresh blueberries and shaved broccoli. Shaving stemmy veggies makes the soft pith the focus instead of the outer skin. I think that's why this recipe works.

This salad is a great transition from winter to spring while broccoli is still in harvest and blueberries are first arriving. I made this my side for Easter dinner, as it makes plenty for sharing. Prepare ahead for best results.
Used the salad as a side to grilled salmon last night. Yumm-o!

Or serve as a light lunch
Blueberry Quinoa Salad with Shaved Broccoli

Ingredients

Salad
2 c quinoa
1 c fresh blueberries, washd
1 bunch broccoli stems {you can include the florets, finely chopped}
1/2 c pistachios
1/2 c crumbled feta

Dressing
1/4 c cherry pit vinegar {can substitute raspberry or red wine vinegar}
1/4 c olive oil
Juice from 1 lemon
1 T sugar
1 t salt
1/2 t black pepper

Directions
Cook quinoa in 4 c salted water {20-30 minutes}. When cooked, fluff with a fork and cool {takes about an hour}.  Using a peeler, shave broccoli stems into slivers {as seen in the warm asparagus salad}. In a large bowl, combine all salad ingredients.

Mix dressing in a separate bowl until salt and sugar are incorporated and pour over salad. Stir well. Best if allowed to sit for at least an hour before serving.

Serve cold.

Another broccoli hit. Enjoy!

Tuesday, March 12, 2013

Feel Better Tea

My sweet baby girl is sick... again.

She has been hit by cold after teething after cold this winter. Each accompanied by stuffiness and coughs and general malaise. We've developed such a sick day routine that she wakes up from afternoon nap, asks for med-sin, a disney movie and feel better tea.

I don't know how you feel about home remedies. Growing up, I firmly believed all helpful cures came with childproof caps. Then I had sick babies. Tiny ones don't have many options for OTC cold relief. But feel better tea does the trick. Clears sinuses, relieves headaches, settles stomachs. We're believers. 

Note - this tea is for babies over 1 year. Please don't feed honey to infants.

Feel Better Tea

Ingredients
1 bag chamomile tea {or 1 1/2 t loose chamomile tea and an infuser}
1/4 t cinnamon for the little guys, 1/8 t cayenne pepper for the grown ups
2-3 slices fresh ginger {or 1 piece candied ginger}
1-2 t honey {again, please don't feed to infants! Try agave instead}
1 lemon slice
8 oz not quite boiling water water

Let steep for 5-8 minutes. Remove tea bag and serve. I add two ice cubes for the girls.

If a spring cold hits you, I hope you feel better soon!

Monday, March 4, 2013

The day the girls ate sushi

We love the grocery store - small one has a special Trader Joe's dance. Our grocery trips have a sense of ritual about them. Product of a pseudo-foodie momma.

Big one knows all of our regular items. She bounces from tortillas to bananas to garlic, calling back to me, "Mommy, do we need eggplant? What about fresh ginger? Should we buy broccoli today? Ooo, we need eggs and yogurt and edamame." She rushes around the grocery store grabbing the items she knows and shot putting dropping them in the cart. Managed chaos.

We practice school at the grocery store. Find foods that begin with our letter of the week. Identify colors of fruit. Count items aloud as we put them in the cart. We border on disruptive, so I try to time our visits with a lull.

I risk annoying other patrons so that the girls can own their food and know ingredients.

And the girls ever surprise me with their adventurous palates. They eat spinach with goat cheese, pomegranate, hummus, curry and tofu. They're especially drawn to brightly colored veggies: purple kale and orange cauliflower. Showing me that the only foods kids will never eat are the foods we never put in front of them.
Not to say they eat everything equally. We're hit or miss with fish. DH spoiled them with fresh caught rockfish. Everyone should be so lucky. Small one spits out even tiny pieces of onion. Big one is on an unAmerican I-hate-Mac-n'-cheese kick. But we keep trying old stuff and introducing new stuff.

So I'm introducing a recipe from my sis that my girls devoured, once again surprising me with their willingness to explore different flavors.

Sushi Salad courtesy of Sarah Kerley

Dressing
3 T soy sauce (Tamari soy sauce is often gluten free)
3 T sesame oil
3 T rice vinegar
2 t wasabi (optional)
1 clove garlic, crushed
1 t sugar
2 T each white and black sesame seeds (or 4 T white sesame seeds), lightly toasted

Salad
1/2 lb rice noodles (you could substitute 2 packages of ramen noodles sans the flavor package)
1 cucumber, shredded
2 carrots, shredded
1 avocado, diced
1 lb edamame, cooked and shelled
Up to 1 c shredded seaweed such as nori and/or wakame

Directions
Mix all dressing ingredients in a small bowl, stirring until sugar dissolves. Boil the rice noodles (like spaghetti, but they cook in 5-7 minutes depending on the width) and drain. Combine all salad ingredients in large bowl. Pour dressing over and toss to coat evenly.

Serve warm.

Makes 6 servings.

This is even better the next day. Heat it up for half a minute in the microwave and enjoy. You can also top it with cooked shrimp or lump crab meat. A seared tuna steak would be a lovely addition to fancy it up a bit.

Sorry I don't have a picture. It didn't last that long.

Wednesday, January 30, 2013

Chocolate weather {or another cookie recipe}

We are having chocolate weather. All I can think to serve for snack are chocolate chip cookies, hot chocolate, biscotti, mochas. Rain and snow and more rain {and maybe pregnancy} will do that to you. We have chronic wet feet. Big one stalls at the open van door while she musters the courage to face the rain again, leaving small one and I dripping - chocolate seems to be our only cure.


 The snow brought at least 30 minutes of outdoor fun. More than that for Abby - this was her first snow, small as it was. Her excitement was contagious when she realized she could eat the white powdery stuff all over the ground.

Almost contagious. Small one was unsure of the snow, and why she needed mittens, and a hat, and a coat. She thought momma was entirely overprotective with the winter clothing. Except the pink boots. Those could stay.


A morning of firsts, passed from daddy to daughter: snow angels, snow men, snow balls. All tiny due to the tiny snow. Perfect for tiny hands.

And when tiny hands turned red and became more cold than fun, momma was able to pass on fudgy warm cookies, like only-edge-piece brownies. They were so delightful {and devoured} that I must pass on the recipe.

Double Fudge Cookies

Ingredients
3 c or 375 g powdered sugar
3/4 c or 65 grams cocoa powder {best you can find}
1/4 t salt
2 1/2 c chocolate chips {I use the 70% cacao 'pound plus' bar from Trader Joe's and cut up what I need}
4 egg whites
1 T vanilla extract

Directions
Preheat oven to 350 degrees. Line two large cookie sheets with parchment paper.

Mix powdered sugar, cocoa powder and salt in a medium bowl. Stir in chocolate chips. Mix egg whites and vanilla in a separate bowl. Add whites and vanilla to dry ingredients and mix with a fork(!) until batter is wet through.

Using a teaspoon {from your silverware drawer, not the measuring variety}, scoop small balls onto the parchment paper-lined cookie sheet, leaving plenty of space. These cookies double, even triple in the oven.
I know they look like little plops here, but magic happens in the oven.

Bake in center of oven for 13-15 minutes, until tops crack.

Remove cookie sheet from oven and allow cookies to cool on sheet for 3 minutes, then move parchment paper to a rack and cool completely before removing. I used a 'cookie spatula,' a small square silicone spatula - they picked up beautifully.

Makes two dozen cookies.

Did I mention they don't require flour, don't require beating egg whites until stiff, and would make the best ice cream sandwich on the planet??

Note for my glutenous friends: A friend made these for me and the girls as part of the funeral fare. Bookmark this recipe as an easy gluten free recipe if you don't have a gluten free kitchen - no need to buy special flour.


Tuesday, January 29, 2013

Well worth it Granola

The roar of the grinder, click of a heating oven, bustle of washing dishes and sweeping floors, mixing ingredients. First trimester ickiness is so last month.

And we're eating real food. Fresh veggies and homemade bread. I even made ricotta cheese yesterday (yummy). I haven't felt this "normal" in months.

I got some terrific cookbooks for Christmas, books I'd eyed for months. My book this week is Alana Chernil's Homemade Pantry. Here I was jonesing for cereal, and she reminded me that I can always make my own. Delicious, gluten free granola. We've tried the store bought variety. Dried fruit and nuts stuck to corn chips(!). Huge disappointment. And really once you've had fresh from the oven, cinnamon smoldering granola, you never reach for a box again. Plus it takes about 10 minutes of undivided attention. That's less time than I take reading ingredient lists at the grocery store.

Best of all, this recipe is flexible. If mine doesn't come out clumpy enough, add sugar and oil. The fruits, seeds and nuts are completely your preference. Even the baking time can be adjusted to suit. So make it yours.

Well worth it Granola

Ingredients
8 c rolled oats (gf if need be)
2 c seeds (sunflower, sesame, amaranth, flax, chia, pumpkin, buckwheat/kasha - use what you have)
2 c chopped nuts (use your favorite)
1/2 t salt
1-2 T cinnamon

1/3 c oil (I use coconut or sunflower seed)
3/4 c applesauce or canned pumpkin
1/2 c maple syrup or honey
1-2 T vanilla

Directions
Preheat oven to 300 degrees. Grease two large casserole dishes.

Mix all dry ingredients in your largest mixing bowl until evenly incorporated. Mix wet ingredients in separate bowl until mixture is smooth. Poor wet ingredients over dry and stir until evenly coated.

Lay raw granola in prepped dishes and spread evenly. Cook for 30 minutes. Stir and rotate. Repeat twice. When granola is golden and crunchy throughout, turn off oven and allow granola to cool in the oven for a couple hours.

When cool, transfer to canisters. If you want dried fruit in your granola, you can add it now or when you serve it.

Enjoy in handfuls, in yogurt, over ice cream. Any time really.


Wednesday, September 19, 2012

You-can-do-this Caramel Sauce

A substitue teacher at my alma mater held his cup of coffee, sniffed the steam, and sighed: Ahh, coffee. Nectar of the gods. Every cup. Every time. It became one of my family's silly jokes that we quote as if everyone's in on it.

I sigh the same way over a cup. A sense of relief at what I'm about to sip.

But the phrase is all wrong {and maybe my attitude}. The God that does not sleep or slumber also does not brew a pot before watching over the eastern seaboard. Not ambrosial nectar.

Delicious as it is, coffee is a product of weakness. Weakness that is the penalty of sin. I'm exhausted, subjected to futility because I live in a messed up world. The wages of sin is death, thus my body runs down, my mind clouds over. The better remedy is sleep. When sleep isn't an option, coffee.

My thoughts over a cup should run, Lord, save me from this frail body. In the mean time, thank you for stimulants.

Now that I have justified coffee as a reminder of the cross, let's talk about how to make it yummy. {Was that not the strangest lead in to a recipe??}

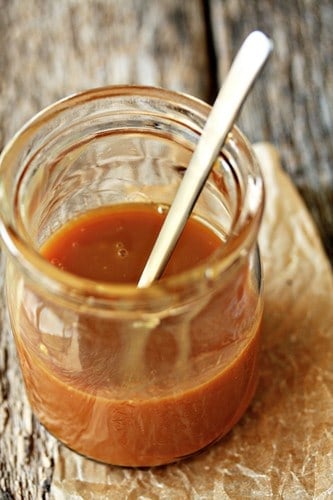
You can do this! Caramel Sauce
Absolutely perfect for a homemade caramel macchiato or hot chocolate or cider or a spoon. Really anything.  What says "Welcome Fall!" like a jar of browned sugar and cream?
photo credit

You will need:
a wooden spoon or heat resistant spatula
a heavy duty sauce pot, 3 or 4 quart

Ingredients
1 c sugar
1/4 c water
1 T honey {you can use cornstarch if you don't like the flavor of honey}

1/2 c heavy cream
1/4 c water
pinch of salt
1/2 t vanilla

Directions
Combine the sugar, water and honey in sauce pot and heat over medium. Stir occasionally while sugar dissolves. As sugar cooks, it will bubble and darken. Keep stirring occasionally to avoid uneven heat {you don't have to stand over it...yet}. When the sugar turns amber {this takes longer than you think}, keep a close eye on it and stir more frequently. Cook 3-4 more minutes until the sugar is the color of a penny.
Remove from heat. And stir in heavy cream and water {this will sputter and splatter}. If some of the sugar clumps with the cool liquid, return to low heat and stir until it melts in. When sugar is fully mixed in, add the salt and vanilla.
Pour into a ball jar and store in refrigerator. Thanks to the water, this recipe should be pourable from the fridge. If it's a little stiff, heat it in the microwave in 30 second bursts. The caramel sauce will keep for months, but it won't last that long {smile}.

In case you're wondering how someone who barely blogs once a week finds time to make caramel sauce, well... I was jonesing for a caramel macchiato. All the preservatives and artificial colors in store-bought caramel bothered me, so I made my own. I realize that is a bit like complaining of light pollution from a forrest fire. What can I say? I'm a little ridiculous.

Thanks to My Baking Addiction for the inspiration.

Wednesday, August 22, 2012

Sandwich Bread

Today, I am offering what might feel to you normal 'glutenous' people like another gluten free bread recipe. To those of us gluten-freer's, I share golden, light, non-crumbly yeast bread. I've been working on this recipe for months, and only chose to publish it after proving it consistent. If you have any questions, ask me. I might have run into the same problem.
 Honestly, when was the last time you saw gf bread softly bend like this?
GF Sandwich Bread

Prep yeast:
2 T yeast
3/4 c warm water
Stir yeast in warm water and set aside for 10-15 minutes

Whisk flour mixture in separate bowl:
1 c milled flax seed
3 c whole grain flour mix {I use equal parts millet, yellow split pea and sweet rice}
2 t salt
2 t xantham gum

Using a stand mixer, mix:
2 eggs
prepped yeast and water
1/3 c honey
1/3 c kefir {1/2 c plain yogurt}

Add flour in 1 cup increments to the wet ingredients. This is the crucial step - Beat on medium high for 5 minutes until dough looks whipped {you are aligning the protein in the eggs just like you would kneading wheat bread}. Move dough to greased bread pan. Wet hands or spatula to smooth out the top. Allow bread to rise for 20-30 minutes {it over rises easily and will fall in the oven}, then turn oven to 350 degrees. When preheated, bake for 40 minutes, rotating the bread halfway through.

You guys are great. Thanks for reading this silly blog and for commenting and encouraging me. I really appreciate your time!

Thursday, July 26, 2012

Homemade Ice Cream

My fanaticism about ice cream started in the womb {or so my mom tells me}. She couldn't drive past a Baskin Robins during her third trimester. My tastes have moved from vast quantities of cheap ice cream to, well, Ben and Jerry's, and any other rich frozen custard laden with chunks of unexpected ingredients.

Last birthday, my awesome in-laws celebrated my love of ice cream {and 28th year} with a trip here:
Jeni's Splendid Ice Creams in Columbus, OH
for breathtaking ice cream. Flavors that redefined what ice cream can incorporate. So my birthday present became...
Jeni's Splendid Ice Creams at Home
Confession: I study cookbooks; I mean lost to the world, engrossed in, pour over cookbooks. My family has picked up on my obsession and given great cookbooks such as Julia Child's seminal work, Mastering the Art of French Cooking, or Mollie Katzen's Moosewood Restaurant Cookbook. This Christmas was Deaf Smith Country Cookbook by Marjorie Winn {a daily reader}. Jeni's Splendid Ice Creams at Home feels like a quirky friend that I hang out with for creative inspiration.

About the book: 100 recipes for jaw dropping ice cream. Beautifully illustrated with excellent technical descriptions. Certainly the recipes are written for fussy cooks - the 'sweet potato and roasted marshmallow' ice cream calls for homemade marshmallows. They also require an inquisitive pallet - I just finished caramelizing pine nuts to mix into sweet basil ice cream.  But if involved, mind-boggling gourmet ice cream is your thing {and it is definitely ours}, this book deserves space on your shelf.


Tuesday, July 24, 2012

I need ice down my back today

I have a melancholy streak. I won't label these downturns 'depression.' Not that I'm above depression. But some of you struggle with darkness I don't understand. I don't want to minimize your fight.

So I say melancholy, Eeyore-ish even. Glum.

To break the spell, my dad would drop a piece of ice down my back, then tickle me so I couldn't remove it. A silly cue to stop seeing only the morose.

Disclaimer: I don't recommend you {especially if 'you' are DH} drop ice down my back when I'm in a dark mood. You will probably catch me in a hormonal tempest waiting for a victim. No, that move is just for my daddy.

All of my drafts today have been dark and harsh. In need of a sanguine editing eye. So I leave them for another day in favor of a whimsical, refreshing moment in the kitchen.

Gluten Free Goldfish Crackers - actually Noah's Ark crackers, but Pepperidge Farm flavor


I found the recipe here. And in an unusual move, followed it to the letter {Alright, I added 1/4 t turmeric to enhance the color, but for me, an exact replica}.

Cutesy cookie cutters {I usually hack rolled dough into odd rectangles}. White rice flour. A moment of uncharacteristic whimsy, especially on a day when I wanted to hunch over black coffee and contemplate the meaningless of life.

I slipped back into my Eeyore costume as soon as the cheddar zoo came out of the oven and dinner plans were upon me.

However, the crackers are amazing! {when was the last time I used an exclamation point?? Amazing!}

LinkWithin

Related Posts with Thumbnails