Showing posts with label dessert. Show all posts

Wednesday, September 19, 2012

You-can-do-this Caramel Sauce

A substitue teacher at my alma mater held his cup of coffee, sniffed the steam, and sighed: Ahh, coffee. Nectar of the gods. Every cup. Every time. It became one of my family's silly jokes that we quote as if everyone's in on it.

I sigh the same way over a cup. A sense of relief at what I'm about to sip.

But the phrase is all wrong {and maybe my attitude}. The God that does not sleep or slumber also does not brew a pot before watching over the eastern seaboard. Not ambrosial nectar.

Delicious as it is, coffee is a product of weakness. Weakness that is the penalty of sin. I'm exhausted, subjected to futility because I live in a messed up world. The wages of sin is death, thus my body runs down, my mind clouds over. The better remedy is sleep. When sleep isn't an option, coffee.

My thoughts over a cup should run, Lord, save me from this frail body. In the mean time, thank you for stimulants.

Now that I have justified coffee as a reminder of the cross, let's talk about how to make it yummy. {Was that not the strangest lead in to a recipe??}

You can do this! Caramel Sauce
Absolutely perfect for a homemade caramel macchiato or hot chocolate or cider or a spoon. Really anything.  What says "Welcome Fall!" like a jar of browned sugar and cream?
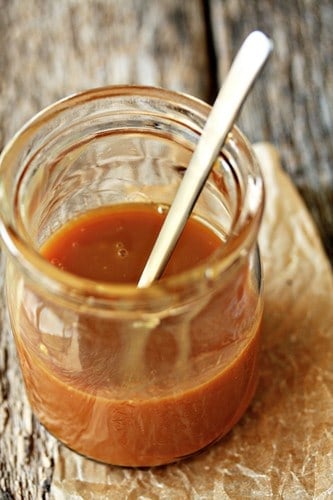
photo credit

You will need:
a wooden spoon or heat resistant spatula
a heavy duty sauce pot, 3 or 4 quart

Ingredients
1 c sugar
1/4 c water
1 T honey {you can use cornstarch if you don't like the flavor of honey}

1/2 c heavy cream
1/4 c water
pinch of salt
1/2 t vanilla

Directions
Combine the sugar, water and honey in sauce pot and heat over medium. Stir occasionally while sugar dissolves. As sugar cooks, it will bubble and darken. Keep stirring occasionally to avoid uneven heat {you don't have to stand over it...yet}. When the sugar turns amber {this takes longer than you think}, keep a close eye on it and stir more frequently. Cook 3-4 more minutes until the sugar is the color of a penny.
Remove from heat. And stir in heavy cream and water {this will sputter and splatter}. If some of the sugar clumps with the cool liquid, return to low heat and stir until it melts in. When sugar is fully mixed in, add the salt and vanilla.
Pour into a ball jar and store in refrigerator. Thanks to the water, this recipe should be pourable from the fridge. If it's a little stiff, heat it in the microwave in 30 second bursts. The caramel sauce will keep for months, but it won't last that long {smile}.

In case you're wondering how someone who barely blogs once a week finds time to make caramel sauce, well... I was jonesing for a caramel macchiato. All the preservatives and artificial colors in store-bought caramel bothered me, so I made my own. I realize that is a bit like complaining of light pollution from a forrest fire. What can I say? I'm a little ridiculous.

Thanks to My Baking Addiction for the inspiration.

Thursday, July 15, 2010

Peach Frozen Yogurt

For the Menchi's and Berry Body fans in the audience.. Peach Frozen Yogurt. Absolutely delicious, I decided to try my hand at frozen yogurt after G polished off half of mine this weekend. To cope with the simmering summer weather, we're enjoying plenty of homemade ice cream maker treats.

Peach Frozen Yogurt
3/4 c milk (whatever percent you want to use)
1/3 c sugar
Mix these two together until sugar dissolves

3 c yogurt (again, whatever fat content you prefer)
1 t vanilla
1/4 t nutmeg
1 c chopped peaches
Combine last four ingredients with the milk/sugar mixture.

Follow ice cream maker instructions to freeze. You could also try placing it in the freezer in a tupperware and stirring frequently.

If you don't eat the entire batch in one sitting, make sure you store it in a microwave safe container. Otherwise, you will need to defrost it slightly before subsequent servings by placing in the refrigerator several hours ahead.

Enjoy!

Friday, July 9, 2010

My Gift to the Youth Group

DH leaves in a week or so for his summer missions trip. Baby G is not exactly ready to help roof a house, so she and I are remaining at home. This will be the first missions trip I've missed, and to be honest, I'm feeling overprotective and controlling about the whole thing, but mainly the food.

For four years of trips (happy anniversary, honey), I've been chief cook and bottle washer as well as the unofficial nurse (have to put that medical training to use somehow). Now, I'm coaching from the sidelines, developing menus and shopping lists, trying to decide what I can prepare ahead of time and send with.

As usual, I will be sending an obscene number of rice krispie treats. They're a signature dish for me. Not that I can't make something more complicated, but in the quantity I'm making them, I prefer simple.

My secret to a not very secret dessert: Rice Krispie Treats

Ingredients:
Basics:
6 c rice krispies cereal
5 c of miniature marshmallows

3 T of butter
1-2 t vanilla
Non-stick baking spray with flour
Extras:
1 c crystal sprinkles - I used these at Christmas for the best rice krispies I'd ever made. Just sprinkle over the top. They will fall through the hot cereal and melt along the bottom.
1 - 2 c chocolate chips - cover the bottom of the pan with chocolate chips, then lay the hot cereal mix over the top for a chocolate base

Directions:
Using a large saucepan, melt the butter and marshmallows together over medium heat, stirring constantly (the microwave affects the consistency and flavor). Add vanilla and stir.
Remove from heat, add cereal and mix thoroughly.
Place in well greased brownie pan and allow to cool.

When I make these for the youth group, I usually make 6 lasagna trays worth. As you can imagine, I use a lot of marshmallows! However, there was a high demand for them with our first youth group. They've been known to disappear within 24 hours - yes, all six trays. Hopefully, it will be a good nostalgic item for DH while he's away from home.

Tuesday, June 8, 2010

Apple Tart

Today, I almost expected Tim to walk into the kitchen and propose to me all over again. Fresh applesauce was cooling in the fridge, a brand new loaf of sunflower and sesame bread was cooling on the rack, and 7 apple tarts were waiting in their flaky shells for his arrival.

When we met, I didn't believe in baking. I thought it was one of Satan's tools to increase your waist line. Kind of ironic coming from a girl who called a pint of Ben and Jerry's "dinner." Nevertheless, I rarely baked, and when I did, I used recipes out of a twenty year old health book - fiber stuck together with a sparse smattering of chocolate chips.

Something changed for me at Christmas. First, I gained a baby and realized that I still liked myself, even 9 months pregnant. Second, I watched "Julie and Julia," which piqued my curiosity about butter - an ingredient I had stubbornly refused to use for many years that also makes or breaks your baking.

So now, I bake; I use the real ingredients, and I bake. To help with the calories, I plan my baking when I can give away part of the batch. Today, I had a friend visiting who hasn't felt well, so I thought she and her husband could use a pick me up. Also, I pre-portion with a muffin tin. It makes cutting a slightly bigger piece or nibbling on tiny pieces all day much more difficult.

I really wanted to make apple brown betty thanks to the suggestion of smitten kitchen's strawberry variety, but I had no bread. So, I decided to make an apple tart instead. The recipe came from the Joy of Cooking. I adapted these slightly to use a muffin tin - I needed a little extra crust and much less filling.


You can see where I just pressed the dough into the muffin cups with my fingers.  Then layered in the cream cheese filling and topped with apples. They did bake a little faster: 10 mins at 425 degrees then 20 at 400 degrees.

Topped with whip cream, these make a lovely dessert when you host. They can be prepared ahead of time, if you can avoid eating them:). Also, they're a great size to accompany coffee in the afternoon.

Saturday, March 20, 2010

Azteca Chocolate Cake

Traditionally, I didn't like chocolate, in any form. My mom swore I could not possibly be her child, but one look at us silences that. Then she told me that I would grow into it. Like most things, she was right. Through pregnancy,  I gained an affinity for dark chocolate. The rest of the chocolates are a waste of calories for me, but dark chocolate - oh my. I know eventually I'll half to cut back, but right now, I have a daily requirement.

It's my turn to bring dessert to small group. In an effort to curb my appetite for chocolate (I've already had some dark chocolate pistachio toffee from TJ!), I decided to make chocolate cake. Not just any chocolate cake, however. I'm borrowing this recipe idea from my sister. Her version was the best cake I've ever had. I don't know that mine will rival hers, but I had to give this a shot.

I labeled it Azteca Chocolate Cake because the only other time I've had this combination of flavors was at Teavana in the Azteca Fire Herbal Tea. I tried this tea two years ago, and I've never found anything to match it. My procrastination is becoming annoying, so I'll just tell what the flavors are: chocolate and cayenne pepper.

The Official Recipe:

  • 2 cups all-purpose flour
  • 2 cups white sugar
  • 3/4 cup unsweetened cocoa (I suggest Hershey's Dark Chocolate)
  • 2 teaspoons baking soda
  • 1 teaspoon baking powder
  • 1/2 teaspoon salt
  • 1/4 - 1/2 teaspoon ground cayenne pepper (depends on how daring you are)
  • 2 eggs
  • 1 cup cold brewed coffee
  • 1 cup milk
  • 1/2 cup vegetable oil

Preheat oven to 350 degrees. Combine dry ingredients and use a whisk to mix thoroughly. Add the rest of the ingredients and mix. Bake for 35-40 min (if using two 9" round cake pans, 45-50 min if using a bundt pan).

Thanks to All Recipes for the basic cake recipe.

LinkWithin

Related Posts with Thumbnails